Lights and Van Gogh
- Jessica Lasater
.jpg/v1/fill/w_320,h_320/file.jpg)
- May 15, 2020
- 3 min read
Updated: Jun 5, 2020

One of the classes I took at UTA focused on technology and how it relates to art education. One of our projects was to create a tech-inspired art lesson. For my lesson, I chose to create a lighted painting. When I think of painting and light, I can't help but think of expressionism and the unique way Van Gogh treated light in his paintings. Therefore, my lesson involved students creating a painting inspired by Van Gogh. Then students would learn about circuits and construct a circuit into the painting that would be powered by a watch battery. Check out the photos below on the process. You can download the lesson plan under my lessons and demos page, which you can get to by clicking HERE!
First, the items needed are below, I have linked a few of the items to where I found them on Amazon.
Materials:
Canvas (one with a wooden frame is best to contain the circuit)
paint
paintbrushes
scissors
Exacto knife
a square of paper
glue
small led lights
1. map out where to place your lights. Next, create a painting. For my example, I wanted to create a painting of a forest with lightning bugs. Below is a mid-process photo.


2. flip over the painting (once its completely dry) and mark where the lights will go. Using scissors or an Exacto knife (carefully) cut an "X" to place the lights through from the back. If I were to teach this in a classroom, I would do this step for the students to prevent any injuries.

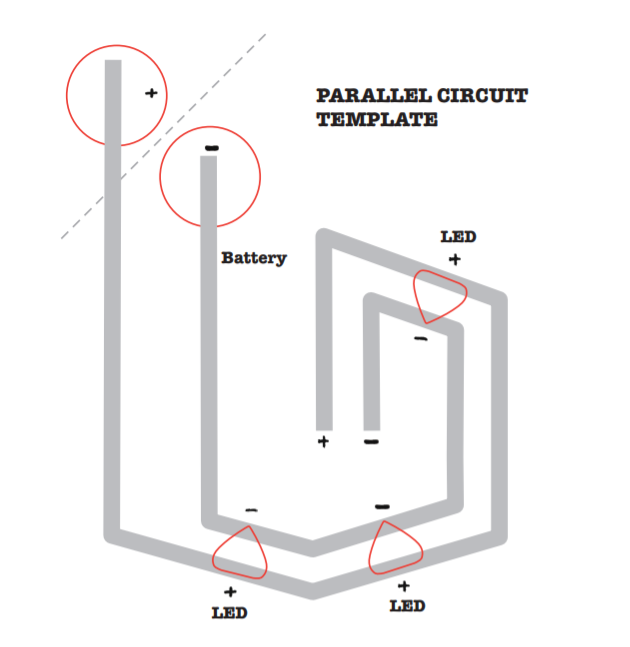


3. Now to create the circuit! I used this
awesome template I found online. It explains how to create a circuit for a light-up card. So I applied it to the painting and included some small adjustments to accommodate for the painting.
Using this as a guide, I first placed the lights through the back of the painting. and separated the diodes. (Pay attention to the packaging because it will explain which diode is positive and which is negative.) In most cases, the longer diode is positive and the shorter is negative.
It is also important to line up both the positive and negative diodes in a way that you can create a line for both currents that don't cross.


4. Now, use the copper tape to create a connection between each of the positive diodes and continue to overlap onto the paper square. Use the top photo to the right as a guide.
The paper square should be pre-folded at a diagonal. This will serve as a pocket for the battery and complete the circuit.
Next, create the second connection between each of the negative diodes. This connection will create a parallel line to the first. Make sure the two do not cross or come too close. Use the bottom photo to the right as a guide.


5. lay the negative side of the watch battery over the negative connection. When you fold the paper square over the battery, it will complete the connection and the lights should light up. Use the paper clip to secure the battery in place to keep it lit.
If it does not light up, check that the copper tape is secure on each connection. Also, check each light on the battery prior to attaching them.
I found that storing the battery in the paper fold upside down when you don't want it to be lit so you can keep everything together.
Now you have a lighted painting, inspired by Van Gogh!!! You can find the full lesson plan here, also.


Comments